Category Archives: SL4

Something you should know about LightSwitch Screens – Part 2

Hidden secrets of LightSwitch Screens continued!

Is this something you should be concerned with? Let us re-phrase that, do you have a rich-client LightSwitch application? Then in all likelihood the answer is yes (unless you have not progressed past some one screen wonder bit of demoware). Thought so, you had better read on…

This article is part of a series of posts from Xpert360 Development Team to address real world scenarios and problems faced when designing, creating and implementing Visual Studio LightSwitch applications. Brought to you by the original and genuine Power Tools for Visual Studio LightSwitch!

You may be asking yourself “Can this happen to me?”. Continuing with the previous blog article’s Contoso application (Part #1), let us create a new screen.

LightSwitch Contoso Add Screen

LightSwitch Contoso Add List and Details Screen

So here I create a standard List and Details Screen for the Appointments entity. That is it, we now have some optimisation work to do. Was that too easy to reproduce?

Appointments List Detail screen hidden items

Appointments List Detail screen hidden items

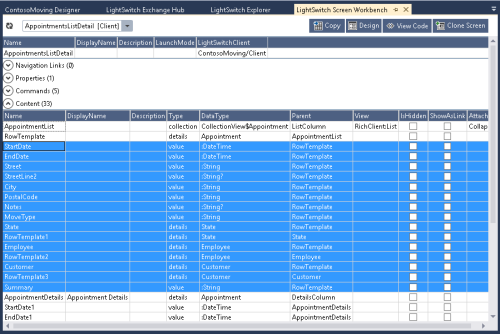
Using the LightSwitch Screen Workbench we can see the hidden screen content items. These screen content items can be viewed using the standard LightSwitch Screen Designer, it is just that the metadata is not so obvious and accessible as in the AIDE for LightSwitch views.

Appointments List Detail hidden items

Appointments List Detail hidden items

This is where your powers of observation come into play. It is obvious is it not? The hidden items are listed in the properties window there on the right. Surely you noticed this before. You select a hidden item and the designer… selects and displays its parent node.

Anyone for editing the Client.lsml or the AppointmentsListDetails.lsml in VS2013? In this case you don’t need to.

Using the Contoso Home screen example from earlier here is how to delete the items. First switch the parent screen item from Summary to Columns Layout.

Contoso Home List Summary to Column Layout

Contoso Home List Summary

Then select the exposed items and delete them (click then shift-click to select multiple items). Press delete and they are gone.

Contoso Home List Columns

Contoso Home List Columns

Then switch the view back from Columns Layout to Summary. Done!

These are just simple examples, extra screen items can be littered across your screens. If you switch an item’s view from Summary to a grouping then back again, the mere act of doing this will create the extra items but will not remove them.

When we move to more complex, larger real-world application this can get to be a serious problem. This next example shows an entity with wide rows from the Dynamics CRM data adapter. Take Contacts or Accounts, they have many properties and screens can suffer from severe performance degradation both at design-time and run-time.

Dynamics CRM Contact List Detail in LightSwitch

Dynamics CRM Contact List Detail in LightSwitch

Here you can see that the Contacts entity has 153 properties. The simple Contacts List Detail screen has more than 300 screen content items due to the hidden items doubling-up. If you deleted most of the visible Contact properties, perhaps leaving 10 visible, you would quite likely expect the screen metadata to be small. Unfortunately with the hidden 150 items it will not be. That is, unless you take action.

When optimising existing screens you will have to ensure that you did not access the extra items in custom code-behind. It is unlikely.

If you can use the standard LightSwitch Screen Designer to make these optimisations then the process must be legitimate, is it not?

Conclusions

This particular feature only affects the Rich Client Silverlight screens, not the HTML Mobile Client variety. It affects LightSwitch in VS2010, VS2012 and VS2013 varieties. This mostly affects List Detail screens and the default Summary property of the main entity. However it can afflict any screen with Summary items, it depends on what you did in the screen designer!

You need to use AIDE for LightSwitch views to more easily see the extra hidden screen items. You can struggle through with the property window list of screen items, but with complex screens this is difficult [in the standard LightSwitch Screen Designer].

If you use AIDE for LightSwitch Explorer or Screen Workbench you can obtain a list of the screen contents and export them to Excel. Then you can use Excel’s data table auto-filtering feature for further analysis.

Stay safe and may your LightSwitch applications perform better, until next time…

Oh, and the answer was No, I did edit the Client.lsml metadata, perish the thought.

Experiencing screen designer freezes and hangs? look HERE and HERE cast your votes and register your interest. It looks like more pressure is needed before this will be taken seriously. Visual Studio 2012 Update 2 onwards and VS2013 RC when your project supports globalization/localization.

ooo

Try them and support your LightSwitch tooling ISVs.

Also, do participate in forums and vote on your desired AIDE features. Help us to help you by prioritising the features in the product roadmap. VS2013, check! Export/Import entities and settings, check! Do you want to shape data to exclude columns? How about a localization workbench? Optimization workbench? Update metadata in bulk? That is a flavour of a few forthcoming features and ideas, we always keep a few things secret to surprise you!

ooo

Company information: Xpert360 Ltd, founded in 2009, is an Independent Software Vendor and Custom Solution Provider based in the United Kingdom.

Xpert360 Lightning” and “AIDE for LightSwitch” are trademarks of Xpert360 Ltd, copyright 2013.

PivotViewer Shorts Part 5: Invert Facet Category Selections

Silverlight PivotViewer Invert Facet Category Selections

Silverlight PivotViewer Invert Facet Category Selections

Introduction
By default the Silverlight PivotViewer control does not support inversion of a facet category’s selections, even though internally the control has the functionality.
Some people have expressed a wish to improve the UX with a custom button to implement ‘invert selection‘.
This short post shows how to locate the UI elements for the facet manager and the view model in order to access this feature.
Locating the UI Elements

The flow of the code goes something like this:

  • Locate the “PART_Container” in the tree. This is a Grid control.
  • Locate the CollectionViewerView control.
  • Locate the CollectionViewContainer control.
  • Locate the CollectionViewerViewModel control.
Grid partContainer = (Grid)this.GetTemplateChild("PART_Container");
CollectionViewerView cvv =
    ((CollectionViewerView)(partContainer).Children[0]);
Grid container = cvv.Content as Grid;
Grid viewerGrid = container.Children[1] as Grid;
CollectionViewContainer cvc =
    (CollectionViewContainer)viewerGrid.Children[0];
CollectionViewerViewModel cvvm =
    (CollectionViewerViewModel)ViewBehaviors.GetViewModel(cvv);

The FacetManager contains a method to invert a facet category’s selection:

cvvm.FacetManager.InvertSelectionInCategory(cvc.SortCategory);
FAQ
The easiest way of accessing this feature is with a custom button though no doubt a keyboard shortcut could be conjured up.
You will need some internal Microsoft Pivot references and usings too. Depending upon the extent of your other customizations you will need these:
+
using System.Windows.Pivot;
using Microsoft.Pivot.Internal.Controls;
using Microsoft.Pivot.Internal.Model;
using Microsoft.Pivot.Internal.ViewModels;
using Microsoft.Pivot.Internal.Views;
+
Further things to do
Conclusion
This article is a brief guide to locating some visual elements of the Silverlight PivotViewer control in order to access the internal functionality that inverts the selections of a facet category. It targets the developer who has already started customizing the Silverlight PivotViewer control beyond the public API and alter the UX.
Any comments or request for future topics are welcome.

PivotViewer Shorts Part 4: Restyle the ZoomSlider child controls

Introduction
By default the SL4 PivotViewer control displays a custom control for controling the zoom-level of the tile views. A few people have expressed a wish to totally reskin the control and this is a step along that path that hints at the technique needed to dig deeper into the PivotViewer visual tree.
 
This short post shows how to locate the UI element for the control bar, the ZoomSlider, all its visual elements and then alter their background.
 
PivotViewer ZoomSlider Re-Styling

PivotViewer ZoomSlider Re-Styling


Locating the UI Elements

The flow of the code goes something like this:

  • Locate the “PART_Container” in the tree. This is a Grid control.
  • Or… go direct to the “PART_ControlBar” element.
  • Locate the ControlBarView to access the child controls.
  • Build a list of child controls using VisualTreeHelper.
// Locate UI Elements
    ControlBarView ControlBar = (ControlBarView)this.GetTemplateChild(“PART_ControlBar”);
    Grid ctrlBarContent = (Grid)ControlBar.Content;
    DockPanel ctrlBarDockPanel = (DockPanel)ctrlBarContent.Children[2];
    ContentControl ZoomSlider = (ContentControl)ctrlBarDockPanel.Children[2];
    ContentControl cc1 = (ContentControl)ZoomSlider.Content;
//

// Build a list of the child controls
    var ctrls = GetChildsRecursive(cc1);
//

// Pick out controls and re-style as you wish 
    foreach (UIElement ctrl in ctrls)
    {
        string s = ctrl.GetType().ToString();
        switch (s)
        {
            case “System.Windows.Controls.Button”:
            Button b = (Button)ctrl;
            b.Background = new SolidColorBrush(Colors.Orange);
            break;
        case “Microsoft.Pivot.Internal.Controls.ClickDragSlider”:
            ClickDragSlider cds3 = (ClickDragSlider)ctrl;
            cds3.Background = new SolidColorBrush(Colors.Green);
            break;
        default:
            break;
        }
    }
;

// Helper function for child controls
IEnumerable<DependencyObject> GetChildsRecursive(DependencyObject root)
{
    List<DependencyObject> elts = new List<DependencyObject>();
    elts.Add(root);
    for (int i = 0; i < VisualTreeHelper.GetChildrenCount(root); i++)
        elts.AddRange(GetChildsRecursive(VisualTreeHelper.GetChild(root, i)));
    return elts;
}
+
FAQ
If you want to try out the code there are a few things to watch out for.
+
You will need some internal Microsoft Pivot references and usings too. Depending upon the extent of your other customizations you will need these:
+
using System.Windows.Pivot;
using Microsoft.Pivot.Internal.Controls;
using Microsoft.Pivot.Internal.Model;
using Microsoft.Pivot.Internal.ViewModels;
using Microsoft.Pivot.Internal.Views;
+
Further things to do
Conclusion
This article is a brief guide to locating some visual elements of the Silverlight PivotViewer control in order to customize the styling of the ZoomSlider control. It targets the developer who has already started customizing the Silverlight PivotViewer control beyond the public API.
 
Any comments or request for future topics are welcome.
 

Windows Phone Developer Tools 7.1 (Beta) install

[Updated 25-May-2011]

Introduction
The beta of the ‘Mango’ Windows Phone Developer Tools 7.1 is ready for download here: vm_web2.exe (the installer). I thought it would appear here App Hub Downloads but apparently not so far [UPDATE: download page has been refreshed]. If you have not done so you will also want to register here App Hub.
 
Final release announced on all devices in the Fall 2011. Mango developer devices to ship on July 19th. We will track the progress in this blog article until the final release.
 
Download and Install
 
You will need to exit Visual Studio and Zune applications before the installation will proceed. The full download looks to be 491 MB. You will also need VS2010 SP1 just as for the Silverlight 5 Beta.
Mango - Windows Phone Developer Tools 7.1 (Beta)
Windows Phone Developer Tools 7.1 (Beta) Mango!

Some of the consumer features:

  • Smarter Apps & Live Tiles
  • Groups
  • Local Scout
  • App Connect
  • Internet Explorer 9
  • Threads
  • Multi-tasking
  • People-centric pictures
  • Quick Cards
  • Enhanced Hubs

    Mango - Internet Beyond the browser

    Mango - Internet Beyond the browser

 New API’s in Silverlight for Windows Phone OS 7.1 on MSDN Library – its big, very big!

New Visual Studio Project Templates

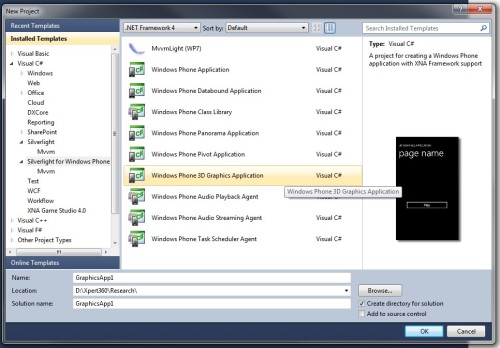
Go open up VS2010 ‘New Project’ and…

Silverlight for Windows Phone templates

Silverlight for Windows Phone templates

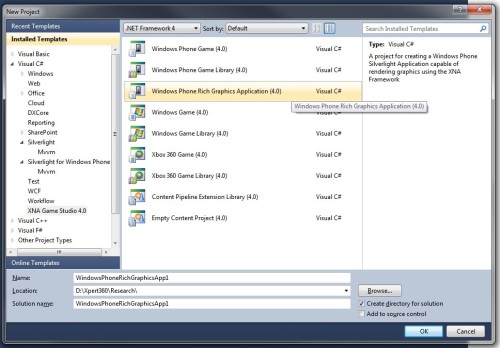
 Also XNA…

XNA templates

XNA templates

Emulator Language Support
 
Full list is here! Now that is a whole lot better than before.
 
As promised, lots more display languages show up in the settings of the emulator, plenty more regional setting and system locales, at last…
Mango Emulator Display Languages

Plenty more…

Many more display languages in Mango

And here is an example of a warm Dutch welcome to the settings page Mango style… 

Windows Phone Settings in Dutch NL
 And if you so desire here is IE9 in the emulator running Bing search under the chinese zh-MO system setting…
WP7 Mango IE Bing Search in chinese zh-MO

WP7 Mango IE Bing Search in chinese zh-MO apparently

 
Feedback
Good things…
 
Gotchas…
 
Further things to do

We will update this blog article with news, bug details, resources links and feedback as it becomes available.

Conclusion
This article is a brief guide to download the ‘Mango’ Microsoft Windoes Phone Developer Tools 7.1 (Beta) released on 24th May 2011.
 
Any comments or request for future topics are welcome.
 

PivotViewer Shorts Part 2: Hide View and SortBy Buttons

Introduction
By default the Silverlight PivotViewer control displays two view selection buttons and a sortby dropdown list of facet names.
Some people have expressed a wish to hide these usually because they want to replace them and control the UX with custom elements.
 
This short post shows how to locate the UI element for the control bar and the child elements in order to alter their visibility.
 
Locating the UI Elements

The flow of the code goes something like this:

  • Locate the “PART_Container” in the tree. This is a Grid control.
  • Locate the CollectionViewerView control.
  • Locate the ControlBarView control.
  • Locate the DockPanel containing the buttons.
// Locate UI Elements
Grid partContainer = (Grid)this.GetTemplateChild(“PART_Container”);
CollectionViewerView CVV = (CollectionViewerView)(partContainer).Children[0]);
Grid container = CVV.Content as Grid;
//
// For exposing the top control bar (title,views,sortby,slider)
ControlBarView ControlBar = ((UIElement)container.Children[2]) as ControlBarView;
DockPanel barDockPanel = (((Grid)ControlBar.Content).Children[2]) as DockPanel;
//
// Hide the controls
barDockPanel.Children[0].Visibility = Visibility.Collapsed; // sortby list
barDockPanel.Children[1].Visibility = Visibility.Collapsed; // view buttons
+
FAQ
If you want to try out the code there are a few things to watch out for. You will probably want to hide the controls when the collection event CollectionLoadingCompleted fires.
+
You will need some internal Microsoft Pivot references and usings too. Depending upon the extent of your other customizations you will need these:
+
using System.Windows.Pivot;
using Microsoft.Pivot.Internal.Controls;
using Microsoft.Pivot.Internal.Model;
using Microsoft.Pivot.Internal.ViewModels;
using Microsoft.Pivot.Internal.Views;
+
Further things to do
Conclusion
This article is a brief guide to locating some visual elements of the Silverlight PivotViewer control in order to hide the view buttons and sortby facet list. It targets the developer who has already started customizing the Silverlight PivotViewer control beyond the public API and alter the UX.
 
Any comments or request for future topics are welcome.
 

PivotViewer Shorts Part 1: Hide Filter Pane Search Box

Introduction
By default the Silverlight PivotViewer control automatically adds a search facet and displays a search box at the top of the filter pane. Some people have expressed a wish to modify the UX and remove this to prevent users performing free text search for some collections.
 
This short post shows how to locate the UI element for the search facet and then alter its visibility.
 
Locating the UI Elements

The flow of the code goes something like this:

  • Locate the “PART_Container” in the tree. This is a Grid control.
  • Locate the CollectionViewerView control.
  • Locate the FilterPaneView to access the child controls.
// Locate UI Elements
Grid partContainer = (Grid)this.GetTemplateChild(“PART_Container”);
CollectionViewerView CVV = (CollectionViewerView)(partContainer).Children[0]);
FilterPaneView FPV = (FilterPaneView)CVV.FindName(“PART_FilterPane”);
//
// For exposing the grid containing the search facet UI elements
ContentControl searchFacetGrid = (ContentControl)FPV.FindName(“m_searchFacetGrid”);
//
// Hide search facet
searchFacetGrid.Visibility = Visibility.Collapsed;
+
FAQ
You will need some internal Microsoft Pivot references and using’s too. Depending upon the extent of your other customizations you will need these:
+
using System.Windows.Pivot;
using Microsoft.Pivot.Internal.Controls;
using Microsoft.Pivot.Internal.Model;
using Microsoft.Pivot.Internal.ViewModels;
using Microsoft.Pivot.Internal.Views;
+
Further things to do
Conclusion
This article is a brief guide to locating some visual elements of the Silverlight PivotViewer control in order to hide the automatically generated search facet. It targets the developer who has already started customizing the Silverlight PivotViewer control beyond the public API.
 
Any comments or request for future topics are welcome.
 

Debugging Data Bindings in XAML with Silverlight 4

[Last updated: 2011-05-24]
Introduction
Yes, you read it correctly, Silverlight 4.
 
How can I do that?

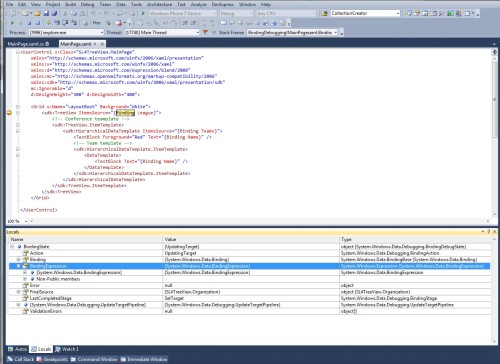
Simply install the VS2010 SP1 and Silverlight 5 Beta and you get the unexpected bonus of the XAML Parser supporting debugging your data bindings for your Silverlight 4 projects. As SL5 sits nicely in VS2010 SP1 with SL4 it is worth installing the beta just for this feature.

Debugging XAML Binding in Silverlight 4

Debugging XAML Binding in Silverlight 4 - bonus!

I was at the @SLUGUK meeting 18th May 2011, and as Mike Taulty pointed out for other ‘features’, it is difficult to know whether such things as this were introduced by the service pack or the beta as nobody seems to have stopped to check in the rush to get the SL5 beta working 🙂

Checked against the NoDo Windows Phone 7 projects and it does not work, you can set a breakpoint but it cannot resolve the symbols. The new feature automatically creates the symbol names for you. I am optimistic that this feature will work with the Mango tooling to be released by end of May 2011 (that’s next week) [UPDATE: Mango beta no Xaml debugging for now].

No point in re-documenting the feature so:

Mike Taulty’s Blog: Silverlight 5 Beta Rough Notes – Debugging Data-Binding

Code Project: Debugging Data Bindings in XAML with SIlverlight 5 Beta

Further things to do and resources 
Conclusion
This article shows a nice side-effect encountered for Silverlight 5 projects after installing the Silverlight 5 Beta. Whether it is intended or here to stay we will have to wait and see but it has already proved to be a fantastic ROI.
 
Any comments or request for future topics are welcome.

PivotViewer Shorts Part 3: Hide Collection path

Introduction
By default the SL4 PivotViewer control displays the path to the collection CXML file whilst it is being loaded. Many people have expressed a wish to hide the path.
 
This short post shows how to locate the UI element for the collection title and then alter its visibility.
 
Locating the UI Elements

The flow of the code goes something like this:

  • Locate the “PART_Container” in the tree. This is a Grid control.
  • Locate the CollectionViewerView control.
  • Locate the ControlBarView to access the child controls.
// Locate UI Elements
Grid partContainer = (Grid)this.GetTemplateChild(“PART_Container”);
CollectionViewerView CVV = (CollectionViewerView)(partContainer).Children[0]);
Grid container = CVV.Content as Grid;
//
// For exposing the top control bar (title,views,sortby,slider)
ControlBarView ControlBar = ((UIElement)container.Children[2]) as ControlBarView;
//
// Hide collection name
((Grid)ControlBar.Content).Children[1].Visibility = Visibility.Collapsed;
+
FAQ
If you want to try out the code there are a few things to watch out for. You will probably want to make the title visible again when the collection event CollectionLoadingCompleted fires.
+
You will need some internal Microsoft Pivot references and usings too. Depending upon the extent of your other customizations you will need these:
+
using System.Windows.Pivot;
using Microsoft.Pivot.Internal.Controls;
using Microsoft.Pivot.Internal.Model;
using Microsoft.Pivot.Internal.ViewModels;
using Microsoft.Pivot.Internal.Views;
+
Further things to do
Conclusion
This article is a brief guide to locating some visual elements of the Silverlight PivotViewer control in order to hide the CXML path during collection loading. It targets the developer who has already started customizing the Silverlight PivotViewer control beyond the public API.
 
Any comments or request for future topics are welcome.
 

Xpert360 PivotViewer Blog Article Index

[Last updated: 2011-06-22]
Introduction
This post is intended to be a landing place to bring together links to our growing collection of PivotViewer articles in one place. We will update this article to reflect new blog posts and other useful links.
If you are not familiar with overriding the Silverlight PivotViewer control’s OnApplyTemplate() method then I recommend taking the time to work through the posts in the ‘Adventures with PivotViewer’ series and build up your portfolio of customization skills.
These articles are based on the version of the control shipped separately from the Silverlight 4 SDK. We will update and extend articles with information relevant to Silverlight 5 SDK as they become available. If you are already customizing your PivotViewer experience then dive right in:
Adventures with PivotViewer
PivotViewer Shorts
PivotViewer Miscellaneous
Examples on the Internet
Further things to do and resources
Conclusion
This article is an anchor page to our blog articles concerning the Silverlight PivotViewer control. There are a range of articles topics and technical levels. Some target the developer who is ready to start customizing the Silverlight PivotViewer control beyond the documented public API, whilst others show examples of what can be achieved.
Any comments or request for future topics are welcome.

Adventures with PivotViewer Part 10: Let’s do the Timelapse Warp

Introduction
Some data sets that have a datetime facet lend themselves nicely to data play back using time lapse. Sometimes playing back data like this can lead to insights that may have been missed through other visualization representations. Finding good examples is hard especially when you can argue that various trends or anomolies would also show up just as easily in more basic graph plots.
 
It would be nice if the PivotViewer filter panel was bound to data so that a timer could fire and animate the selected datetime range so automatically animating the selected PivotViewer items view in a time lapse. For now we can simulate this by manipulating the control’s ViewState and progressing the range for a target datetime facet.
 
Sample Collection Data
We decide to choose a large data set from the FAA (Federal Aviation Administration) in association with the NTSB (National Transportation Safety Board) . The sample collection covers aviation accident data from 2008 and 2009.
 
NTSB 2008 - 2009 Aviation Incidents by Severity

NTSB 2008 - 2009 Aviation Incidents by Severity

 FAA data for aviation incidents by severity for 2008 and 2009 to give you an overview. Incidents resulting in one or more fatalities are colored red.

NTSB 2008 - 2009 Aviation Incidents by Month

NTSB 2008 - 2009 Aviation Incidents by Month

FAA data for aviation incidents by month for 2008 and 2009 which shows the seasonal variation that peaks in August. Be careful not to misinterpret this as the overall volume of flights is not represented.

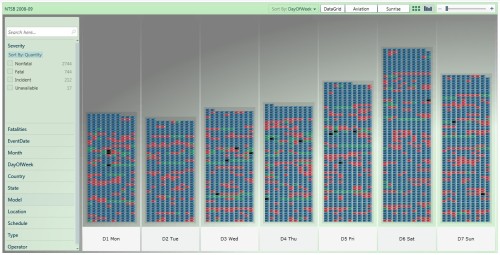
NTSB 2008 - 2009 Aviation Incidents by Day-of-Week

NTSB 2008 - 2009 Aviation Incidents by Day-of-Week

FAA data for aviation incidents by day-of-week for 2008 and 2009 which shows a modest peak on saturdays.

NTSB 2008 - 2009 Aviation Incidents for top States

NTSB 2008 - 2009 Aviation Incidents for top States

FAA data for aviation incidents by state for 2008 and 2009 which shows the states with most incidents: California, Texas, Florida, Arkansas, …

Timelapse of Incidents by State
I don’t know the real reasons for the observed trends though some are likely to be seasonal and others definitely related to holiday periods and holiday destinations resulting in increased traffic.
 
NTSB Aviation Incidents by State - Jan 1, 2008

NTSB Aviation Incidents by State - Jan 1, 2008

Starting in January 2008 the incidents are relatively light with the most in California and Florida.
NTSB Aviation Incidents by State - Jan 15, 2008

NTSB Aviation Incidents by State - Jan 15, 2008

For whatever reason the number of incidents pick up sharply for Texas as we move into early February 2008.
NTSB Aviation Incidents by State - Feb 5, 2008

NTSB Aviation Incidents by State - Feb 5, 2008

Throughout February 2008, the number of incidents increases overall but most markedly in Florida. Meanwhile the incident rate reduced in California.
NTSB Aviation Incidents by State - April 1, 2008
NTSB Aviation Incidents by State – April 1, 2008

Moving forward to April 2008 the distribution of incidents changes again with Texas ahead and Arkansas suffering more.

NTSB Aviation Incidents by State - Jun 24, 2008
NTSB Aviation Incidents by State – Jun 24, 2008

Moving forward to June 2008 the number of incidents across the states builds up and California is tops again but now followed by a peak in Illinois for what reason I do not know.

Here is a short video screen capture of a segment of the timelapsed playback.

FAA / NTSB Video Timelapse

Click to play clip of PivotViewer Timelapse

 There are a lot of additional facets to the full collections of FAA / NTSB data and many more trends and interesting visualization opportunities. Stay tuned to our blog…
 
Links 
Conclusion
This article is just a brief introduction to the possibility of playing PivotViewer collection data back as a timelapsed visualization opportunity. It is arguable whether or not this somewhat fashionable approach to visualization really gives a better insight than more traditional visualization paradigms. It all depends on whether there is really any trends in your data sets that are obscured when viewed as simple charts and graphs. Any comments or request for future topics are welcome.