This article is part of a series of posts from Xpert360 Development Team to address real world scenarios and problems faced when designing, creating and implementing Visual Studio LightSwitch applications.
Intrinsic, or not Intrinsic, that is was the question!
…or at least it has been since LightSwitch launched. Do you connect to an external data source or use an intrinsic database? With more options arriving and techniques advancing for LightSwitch, is this becoming a none-problem?
We certainly like doing database design in LightSwitch for mock-ups, proof-of-concept or prototype applications. We also like LightSwitch for developing demonstrations, POC’s and prototypes.
If only we could transfer LightSwitch assets (screens, entities queries) between projects. Never mind data mash-ups, let’s have some application mash-ups!
- Import pre-built screens samples
- Compose applications from your prototypes
- Backup, copy and restore screens
- Compare projects
In this article we will demonstrate the following, some for the first time publically:
- Create a HTML5 client with Intrinsic database
- Create the application screens
- Deploy the application to IIS and database to SQL Server
- Export the LightSwitch screens
- Create a HTML5 client with external data source
- Import the LightSwitch screens
At the end we will have a fully working copy of our LightSwitch HTML application working against the previously deployed database in SQL Server.
This walkthrough has been certified as code-free and no-lsml-hacking.
What really surprised us is that this demonstration can probably be completed in under 20 minutes. It could be squeezed into a 10 minute Lightning talk I suppose, that would be a mad demo! You could include SQL Azure and SharePoint on-line too comfortably in a 30 minute slot. That is also a scary thought. Well, it is LightSwitch after all 🙂
I created a new LightSwitch HTML C# project, then I chose to add the usual Contact, Product, Order and OrderLine tables into the LightSwitch entity designer. Add a few relationships, nice simple database design.
Then I created a home screen with tabs for Orders, Contacts and Products. Then I wired-up the TileView tap actions to AddAndEdit default screens. Then add a tab to the Order detail screen to handle multiple order lines. Job done!
I added command buttons to add new contacts, products, orders, order lines and substituted the default ‘star’ by the in-built ‘add’ icon. F5 ->
Ok, I swapped out the default logo and splash screen images, I promise, that was all. Then I used the HTML screens to add some test data into the local database.
The application is so good that it now passes QA and gets promoted. With that it is expedited for deployment.
Now we have a SQL database appropriately named AppTest.
And the deployed application is now accessible in IIS on the localhost.
I entered some new sample data as the new SQL Server database was not surprisingly empty. The different data helps to show the different databases.
This post is longer then I expected, but hold on in there for the juicy bits.
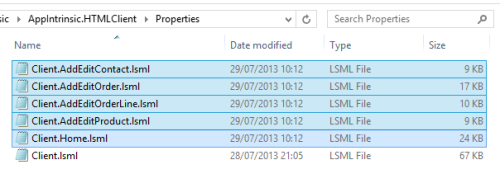
We use AIDE for LightSwitch Exchange Hub for exporting the screens. It extracts the screen XML from the client.lsml file and outputs them in VS2013 LightSwitch Preview compatible format.
Five screens with nowhere to go, yet.
I created another new LightSwitch HTML Client C# project and then navigated over to the Attach Data Source Wizard.
So now we have data. It is the external database in the local SQL Server that we previously deployed.
We have no screens. Now let us import the HTML client screens into our new project using the preview of AIDE for LightSwitch Exchange Hub.
So now we have an external data source and the five imported screens…
Unfortunately, the project will not build 😦
But wait, it is not the end of the world. The screens expected ‘Date’ whereas the imported external data source by default has them as ‘DateTime’ – fixed. The product entity had a ‘Money’ column which by default comes in as ‘Decimal’ – fixed. There, a few manual tweaks to that external data source in the LightSwitch designer and it builds!
The Import/Export Entities and Entity Properties will address that in a forthcoming release of AIDE for LightSwitch.
So we now have not one but two beautifully crafted twin LightSwitch HTML applications.
That concludes Path #1 – Export/Import facility to transfer assets between LightSwitch projects.
Conclusions
In all seriousness, this is meant to be a gentle introduction to manipulating LightSwitch data sources and opening our minds to the concept of transferring LightSwitch assets between projects.
If you have worked with LightSwitch for sometime you will have adjusted your thinking and mindset to working without features readily available in other Visual Studio project types.
Now is the time to switch you thoughts to embrace the possibilities allowed to you by the AIDE for LightSwitch power tools. You will have to change, but change is good!
in this series…
NEXT UP:
LightSwitch Data Freedom – Part 6: Switch data source by modifying project LSML
or
LightSwitch Data Freedom – Part 6: Intrinsic database, make mine a 6GB one!
PREVIOUSLY:
LightSwitch Data Freedom – Part 1: The chains of legacy databases
LightSwitch Data Freedom – Part 2: Walkthrough shaping your data
LightSwitch Data Freedom – Part 3: Pre-filter the data
LightSwitch Data Freedom – Part 4: Intrinsic, or not Intrinsic, that is was the question!


Hi
Where is the part 6 of this series? Thanks
The draft is on my hard drive. We did this for real for a project of Mr Yossu. We discovered a few extra naming convention items to check for during that but it worked out fine. It is on the baclog, sorry!
Any chance of sharing the draft privately? I’m working with this now, and I’ll be happy to share my experiences for your full post.
I am interested too in knowing the part 6 of this series, could you give us in private? Thanks